
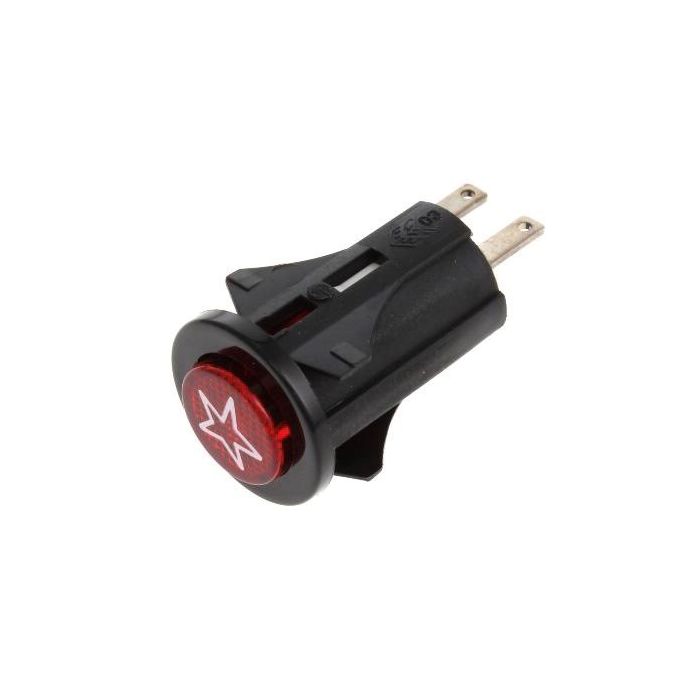
Cooker Oven Ignition Switch
Replacement cooker oven ignition switch – compatible with Ariston, Hotpoint, Indesit and Whirlpool as shown unless advised otherwise
Description
A compatible replacement ignition switch for gas cookers and ovens. The ignition switch is the push-button control that activates the spark generator when you turn on a gas burner or oven.
Pressing the switch sends a signal to the spark module, which produces the spark that lights the gas. This compatible replacement matches the original part's specifications and performance, with the correct shaft diameter, terminal layout, and mounting method for the models listed. Fitting a matched switch ensures the ignition system operates reliably and safely, so you can light your cooker without difficulty.
This ignition switch will only fit the models shown or specifically advised and will not fit any others, as even if it looks the same, it probably won't be, since several look alike but aren't. Please take time to ensure this is correct before ordering. If you are unsure, please don't hesitate to contact us and ask for assistance.
Ignition switches commonly fail through worn or broken internal contacts, moisture ingress from cleaning, or physical damage to the push-button or rotary mechanism. A faulty switch can cause the burners to fail to ignite, spark continuously when not in use, or ignite only intermittently. In some cases, the switch may feel loose or fail to click when pressed, indicating that the internal mechanism has worn out. Because the ignition switch is part of the cooker's safety circuit, replace a failed unit promptly to ensure the appliance operates correctly. This compatible replacement matches the original part's specifications and performance.
 Technical Notes
Specifications: Genuine cooker oven ignition switch. Push-button type. Colour: grey. Reference: SPARK IGNITION SWITCH - BLACK J00061047. Product code: C00032154. Alternate part numbers: 482000026208, HPTC00032154.
Safety note: This component operates on mains voltage. Always isolate the appliance from the electrical supply before beginning any work. Allow the oven to cool completely before touching the switch or the surrounding components. Wear gloves when handling the old switch, as edges may be sharp and the terminals may be live if the appliance has not been isolated correctly. Do not use the appliance if you smell gas at any point during or after the repair.
Fitment guidance: This ignition switch fits only the Ariston, Hotpoint, Indesit and Whirlpool models listed in the compatibility matrix below. Model numbers can be found on the rating plate on the rear panel of the appliance or on the inner edge of the oven door frame. Whirlpool models are shown as TBC — please check your model number with our team to confirm fitment.
ARISTON COOKER & OVEN
A2030, A2030/1, A2030/2, A20301BR, A20301WH, A20302BROWN, A20302GREEN, A20302WHITE, A2230, A2230BROWN, A2230WHITE, FG11BK, FG11BR, FG11WH, GH40, GH40BK, GH40BWN, I-PC40MUK, P140A1GB, P40, PF640MGB, PF740MSD, PF750MGB, PF750MS(AX), PF750MS(BK), PF750MS(SS), PF750MS(TFR), PF750MS(WH)
HOTPOINT COOKER & OVEN
401, A2030, A2230, GH40, P140A.1GB, P40, PF640MGB, PF740MSD, PF750MGB
INDESIT COOKER & OVEN
A2030, A20302, A2230, CPIM5, CPIM5BR, CPIM51BR, CPIM51WH, FIG1, FG11, GH40, I-FG2.1, I-GE2NL, I-GM8NL, I-M40(BX), I-M40AG, I-M40E, I-M40EX, I-M40F, I-M40IR, I-M40NG, I-M40NL, I-M40R, I-M42EX, I-MS40, I-MS40AG, I-PC40MF, I-PC40MUK, I/FG2, I/M40, I/M42, I/M51, IFW 7235 IX, IFW 7246 IX, KN9425WS/G, KN9425XS/G, KN9505WS/G, KN9505XS/G, P31A, P31AEX, P31AF, P40A, P40A(IX)P, P40A(TF), P40AEX, P40AF, P40AGB, P40AIR, P40AR(GN)GB, P40AS, P40AS(IX)DK, P40AS(OW), PF640M, PF640M(IX)IR, PF640M(WH)IR, PF640M.E, PF640M.EEX, PF640M.EGB, PF640MEX, PF640MGB, PF640MNG, PF640MS, PF640MS.E, PF640MS.EEX, PF640MSEX, PF640MSKD, PF640MSNG, PF640MSU, PF740M, PF740MDEX, PF740MDSKD, PF740MEX, PF740MS, PF740MSD, PF740MSDEX, PF740MSDNG, PF740MSDWHNG, PF740MSU, PF750MGB, PF750MS, PF750MSEX, PF750MSP, PF750MSPEX, PI31A.1, PI31A.1F, PI40A(WH)IR, PI40A.1, PI40A.1F, PI40A.1GB, PI40AF, PI40AIR, PI40AIT, PI40AS, PI40AUK, PL640M, SG42G5.2SKD, SG4CG5, SG4CG5.2SKD, SGX42G5.2SKD, SGX4CG5.2SKD
WHIRLPOOL COOKER & OVEN
TBC – Please check your model number with our team to confirm fitment.

Get Expert Oven & Cooker Spare Part Help
Can't find your model number listed or need help identifying the correct part? Contact our parts advisors with your full model and serial number, and we'll verify the correct part for your appliance.
| Further Description |
Common Faults & SymptomsThe following fault codes and symptoms are commonly reported when this part begins to fail. Use this as a diagnostic guide before ordering a replacement — if more than one of these is present, the part is the likely culprit. 1
Error Code A1 (Ariston) — Ignition Failure
Displayed when the appliance fails to detect a flame after the safety time has elapsed, following three ignition attempts. The gas valve is closed and no flame is detected. The most common causes are a faulty ignition switch, a damaged ignition electrode, or a problem with the gas supply. Check that the gas valve is open and follow the activation procedure before replacing the switch.
2
Error Code F01 (Indesit) — Control Board Fault
Indesit ovens may display F01 when there is a problem with the electronic control board or a related circuit. The oven may fail to respond to controls, the clock may stop working, or the display may freeze. While F01 often points to the control board itself, a faulty ignition switch can cause the board to log a fault if it cannot detect the ignition circuit correctly. Check the switch and its wiring before replacing the control board.
3
Error Code F01 (Hotpoint) — Control Board Fault
Hotpoint ovens may display F01 when there is a fault with the electronic control board. The oven may stop responding, the clock may reset, or the display may show error codes that cannot be cleared. A faulty ignition switch can cause the control board to detect an abnormal condition in the ignition circuit, triggering this code. Test the switch and its connections before assuming the board has failed.
4
Error Code F01 (Whirlpool) — Temperature Sensor Fault
Whirlpool ovens may display F01 when the oven temperature sensor is open or short-circuited. The oven may not heat correctly or may display temperature readings that do not match the actual cavity temperature. While this code points to the temperature sensor, a faulty ignition switch can cause the control board to log related faults if the ignition circuit is not functioning correctly. Check both the sensor and the ignition switch before ordering parts.
5
Burners Not Igniting or Igniting Intermittently
The most common symptom of a failed ignition switch. Pressing the ignition button does not produce a spark, or the spark is weak and intermittent, causing the burner to light only after several attempts. In some cases, only one burner is affected, which can indicate that the switch for that burner has failed while the others remain functional. Check that the spark electrode is clean and that the gas supply is present before replacing the switch.
6
Burners Sparking Continuously
The spark continues to fire even when the ignition switch is not pressed, or it fires continuously while the burner is lit. This is a dangerous condition that can damage the spark module and cause unnecessary wear on the ignition electrode. The most common cause is a stuck or shorted ignition switch. Disconnect the appliance from the power supply and replace the faulty switch before using the cooker again.
7
Ignition Switch Feels Loose or Does Not Click
The ignition button or rotary switch feels loose, wobbles in its housing, or fails to click when pressed. This is usually caused by a worn internal mechanism or a broken plastic housing. A switch that does not engage correctly will not send a signal to the spark module, and the burner will not ignite. The switch should be replaced to restore proper operation.
8
Visible Damage or Discolouration on the Switch
Inspect the ignition switch for signs of overheating, burning, or physical damage. Look for discolouration around the terminals, melted or cracked plastic on the housing, or a burnt smell. These indicate that the switch has suffered an internal failure and should be replaced. If the terminals are blackened or corroded, check the wiring and connectors for damage as well.
9
Oven Ignition Not Working After Cleaning
If the oven ignition stopped working after cleaning, moisture may have entered the ignition switch or the control panel. Disconnect the appliance from the power supply and allow the switch to dry completely for at least 24 hours before testing it again. If the switch still does not work after drying, it may have been damaged by the moisture and should be replaced.
10
No Spark at Any Burner
If none of the burners ignite and no spark is visible at any electrode, the problem may be with the spark module rather than the individual switches. However, a failed ignition switch on a model that uses a single switch for all burners can also cause this symptom. Test the switch for continuity and confirm that voltage is reaching the spark module before assuming the module has failed.
Fitment GuidanceThis ignition switch is compatible only with the Ariston, Hotpoint, Indesit and Whirlpool models listed in the compatibility matrix above. Even if a switch looks visually similar, the shaft diameter, terminal layout and mounting method can differ between models, so a part that appears to fit may not operate correctly or may not fit the control panel.
Diagnostic TipsBefore concluding that the ignition switch has failed, carry out these checks to rule out other causes. A multimeter is required for the electrical tests.
Installation GuideThese steps describe the general procedure for replacing a cooker oven ignition switch. The exact sequence varies between models, so always consult the appliance manual where available.
Before Ordering, Check These First
Disclaimer: The fault codes and symptoms listed above are intended as a general guide to assist with diagnosis. They cannot be taken as a definitive diagnosis of any particular problem, and other components may produce similar symptoms. Always confirm the fault with proper testing before ordering parts. |
|---|---|
| Alternate Part Number | HPTC00032154, 5031680185478, 482000026208 |
| EAN Number | 5054127013776 |
| Manufacturer | Hot |
| Genuine Part | Yes |
Oven & Cooker Spare Parts.
Locating your correct model number is the essential first step. Avoid generic user manuals—they often cover multiple chassis types and internal variations that don't apply to your specific unit.
Ovens & Cookers
The rating plate is usually inside the oven door or on the lip of the door opening. For range cookers, check inside the storage drawer or the lower kick-plate.
Built-in Hobs
Hobs present a challenge: the data is typically on the underside. You may need to remove a drawer or look up from inside the cupboard below to view the sticker.
Intelligent Part Filtering
We only list parts with a proven failure rate or those specifically requested by engineers. This limits irrelevant results and ensures you find only what fails, rather than parts that are almost never required.
! Images & Sizes for Information Only
Oven elements and thermostats may vary in shape, terminal position, or wattage from the images shown. Manufacturers frequently alter specifications mid-production.
IMPORTANT: Many heating elements look nearly identical but have different mounting points. Do not rely on visual matching—verify via your model data or ask our specialists.
Right Part, First Time.
Ordering the wrong cooker part is a hassle and an unnecessary expense. We want to help you avoid the frustration of incorrect fitment.
Email allows us to exchange technical diagrams and exploded drawings. This is the fastest way to confirm your repair and find the cheapest compatible options available.
Unsure about a part?
Don't be hasty. One wrong digit leads to the wrong part.
Verify With An ExpertExpert Component Sourcing • Technical Sourcing • Established 1988
 Beko Europe & Whirlpool Group Specialist
Hotpoint
Spare Parts.
Hotpoint remains Britain's most ubiquitous appliance brand. Following the 2005 Indesit acquisition and subsequent Whirlpool ownership, it is now part of Beko Europe. This legacy means components are shared across Hotpoint, Indesit, Ariston, and Whirlpool machines globally.
The Data Accuracy Requirement
Hotpoint production involves constant technical revisions. To guarantee fitment, we require the Full Model, Industrial Code, or Serial Number. A part that looks identical may have different terminal configurations or thermostat tolerances.
Group-Wide Fitment
Many Hotpoint parts are identical to those badged under Indesit or Whirlpool. We use our technical legacy database to cross-reference these shared components, often identifying more affordable "group-standard" options that keep your appliances running efficiently.
Verified Suitability
As with modern vehicles, appliance parts change mid-production. Our standing advice is to ask our specialists to confirm fitment if you are unsure. We provide manual verification to ensure that the part you receive is exactly what your machine requires.
Confirm Your Hotpoint Parts
Don't risk ordering the wrong part for your washing machine or oven. Our technical helpdesk can cross-reference your codes against the entire Beko Europe network to find the exact component you need.
Contact Support TeamHotpoint Technical Expert • Beko Europe Platform Specialist • Established 1988
UK'S Professional Appliance Spare Part Network • Established 1988
Delivery & Returns Information.
We aim to get your parts to you as fast as possible. We are transparent about lead times, stock availability, and our returns process to ensure a smooth repair.
Stock Availability
Please be aware that we show availability but do not display live stock levels online. Estimates are based on average manufacturer lead times.
Tradesman Warning
Do not arrange a tradesman until your goods have arrived and been checked. We do not cover tradesman costs due to transit delays or suitability issues.
Understanding Lead Times
Normally a UK stock item. Dispatched same or next working day. Some items may take longer depending on specific warehouse location.
Usually a UK/EU stocked item but with a longer lead time. Contact us before ordering for specific clarification if the repair is urgent.
Factory or Custom order items. These are ordered specifically for you and cannot ordinarily be returned. Please allow the full time indicated.
Order Transit
Orders placed before 3:00 PM (Mon-Fri) for in-stock items are typically dispatched same-day.
We use Royal Mail, DPD, and Evri. Tracking information is emailed upon dispatch. Delivery times to rural or offshore areas will vary.
Heavy/Oversized Items
Items such as dishracks, tubs, and glass cooktops may incur additional fees due to weight and specialised packaging requirements. We will contact you if additional shipping is required.
Returns Policy
Damages
Report transit damage within 24 hours. Include a photo of the damage and the packaging to speed up the claim process.
Cancellations
You have 14 days after delivery to cancel. This must be done via email or support ticket (not phone/chat).
Exclusions
We cannot accept returns for items that have been fitted for fault-finding, used, or custom-ordered.
How to Return an Item
Contact us with your order number and reason for return.
Wait for instructions and the correct returns address (this varies by item).
Package carefully. Do not deface original packaging. Use tracked post.
Have questions about your delivery or a potential return?
Contact Support Team98% of orders delivered on time • Expert Resolution • Established 1988