
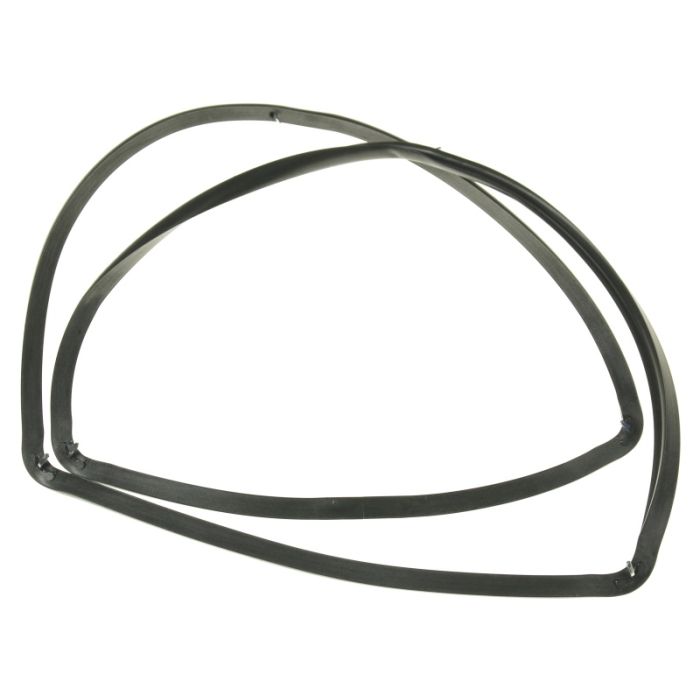
Tall Oven Door Seal Gasket
Replacement tall oven door seal – compatible with Smeg ovens & cookers as shown unless advised otherwise
Description
The door seal, also known as the door gasket, is the flexible heat-resistant rubber strip that runs around the inside edge of the oven door or the oven aperture. Its job is to close the gap between the door and the cavity when the oven is shut, forming a heat-tight barrier that keeps the hot air where it belongs.
On a tall oven with a glazed door, the seal is usually clipped or pressed onto a mounting channel around the aperture or door frame, and the profile's shape and depth closely match the door casting. Once the door is closed, the seal compresses along its full length, which allows the oven to hold temperature steadily through the cooking cycle. A properly fitted seal also protects the outer door glass, the door hinge and the control panel from the full heat of the cavity, and it prevents steam and cooking odours from escaping into the kitchen.
Door seals fail gradually, and the earliest symptoms are easy to overlook. The most common complaint is that the oven takes longer than it used to reach temperature, or that it never quite holds the setting the dial shows. Food cooks unevenly, bakes brown more on one side, or needs extra time. In other cases, the door fails to sit flush against the cavity, either because the seal has hardened into a set shape or because a section has dropped off its retaining channel. Once the seal is no longer pressing firmly against the aperture, heat escapes continuously, which drives the thermostat to work harder and puts extra strain on the element and the door hinges. A visible split, a shiny compressed patch, a section that has hardened or crumbled, or a strip that has come away at one corner are all signs that the seal is at the end of its life. Replacing a worn seal restores proper heat retention, brings cooking times back to normal and keeps the outer door surfaces at their intended temperature.
 Technical Notes
Specifications: Genuine tall oven door seal (door gasket) for Smeg ovens and cookers. Manufactured from heat-resistant flexible rubber compound suitable for continuous contact with oven cavity temperatures. The seal is formed with a moulded mounting bead that engages the retaining channel around the oven aperture or door frame, together with a compressible lip that presses against the door or cavity when closed. Supplied as the seal only, without the door, hinges or retaining clips. Product code: 754132199.
Fitment guidance: This door seal or gasket will only fit the tall oven on the Smeg models as shown or as specifically advised and will not fit any others as even if it looks the same, it probably won't be as there are several that look alike yet are not. Please take time to ensure this is correct before ordering. If you are unsure please don't hesitate to contact us and ask for assistance. On a range cooker with more than one oven, this seal is intended for the tall oven only and not for the smaller or secondary cavities, so confirm which oven the seal is required for before ordering. The model number is found on the rating plate, normally located on the rear of the appliance, behind the plinth or on the inside of the door frame. Match the complete model number, including any suffix or regional code. Oven door seals can look very similar while differing in profile depth, corner radius and mounting bead shape, so never order on appearance alone — compare the profile of your original seal with the new one, and check the length against the aperture before fitting.
Diagnostic tip: Open the door and run a finger along the full length of the seal, easing any folds apart as you go. Look for splits, perished or crumbled sections, shiny compressed patches where the seal is no longer springing back, and any section that has come away from the retaining channel. Close the door on a strip of paper at several points around the aperture and pull gently: the paper should resist evenly all the way round, and any point where it slides out freely shows a section of seal that is not pressing properly. Check that the door closes squarely and that the hinges are not worn, since a door that has dropped will leak even with a new seal. Inspect the retaining channel around the aperture for distortion, rust or hardened grease, and clean it thoroughly before fitting. If the oven takes too long to reach temperature even with a good seal, check the thermostat and element before ordering further parts.
Installation guide: 1. Switch off and unplug the appliance, or isolate the cooker circuit at the consumer unit, and allow the oven and door to cool completely. 2. Open the door and, where the hinges allow, remove the door from the appliance or support it in the open position so you have clear access to the aperture. 3. Pull the old seal away from its retaining channel, working around the aperture a section at a time, and keep note of how the mounting bead sits in the channel. 4. Clean the retaining channel thoroughly, removing baked-on grease, crumbs and rust, so the new seal can seat evenly. 5. Inspect the channel for distortion or damage, and check the door hinges and door alignment before fitting the new seal. 6. Starting at a top corner, press the mounting bead of the new seal into the retaining channel, working progressively around the aperture. 7. Ease the seal around each corner, taking care not to stretch or twist it, and check that the compressible lip faces the correct way. 8. Continue around the aperture until the seal meets the starting point, trimming only if the seal is designed to be cut to length, and join the ends neatly. 9. Close the door and check that it seals evenly around the whole aperture and that the door sits flush, adjusting the seal or the hinges if any section is not compressing. 10. Restore the power and run the oven on a low setting for ten to fifteen minutes, then check the door edge and outer glass for excessive heat, which would indicate the seal is still not seating correctly.
Safety note: Always isolate the electrical supply before working on an oven, and allow the appliance, door and seal to cool fully, as the seal and door components become extremely hot during use. Oven door seals are exposed to high temperatures and to cleaning chemicals, so never use abrasive cleaners or sharp tools on the new seal, as these will damage the surface and shorten its life. Do not stretch a seal to make it fit, and do not use sealant or adhesive around the gasket unless the original manufacturer specifies it, as this prevents the seal seating correctly and will cause further leaks.
SMEG OVEN & COOKER
BM93BL, BM93IBL, BM93IP, BM93P, BM93S, BU93BL, BU93P, BU93R, BU93S, SY93, SY93BL, SY93I, SY93IBL, R93BL, R93BLD, R93CNL, R93CNLK, R93GR, R93IBL, R93IP, R93IX, R93NNL, R93NNLK, R93P, R93PD, R93X, R93XD, R93XNL, RA93BL, RA93P, TR93BL, TR93BLD, TR93CNL, TR93CNLK, TR93GR, TR93IBL, TR93IGR, TR93IP, TR93IX, TR93NNL, TR93NNLK, TR93P, TR93PD, TR93X, TR93XD, TR93XNL, TRA93BL, TRA93P

Get Expert Smeg Spare Part Help
Can't find your model number listed or need help identifying the correct part? Contact our parts advisors with your full model and serial number, and we'll verify the correct part for your appliance.
| Further Description |
Common Faults & SymptomsSmeg ovens do not normally display a dedicated fault code for a worn door seal, so the symptoms below are the ones most commonly reported when the gasket begins to fail. Use this as a diagnostic guide before ordering a replacement — if more than one of these is present, the seal is the likely culprit. 1
The Oven Takes Much Longer To Reach Temperature
The oven heats more slowly than it used to, and the preheat light stays on for noticeably longer even on a setting you know well. Heat is escaping continuously past a hardened or compressed seal, so the cavity never holds its temperature efficiently. Check the seal before assuming the thermostat or element has failed.
2
Food Cooks Unevenly Or Browns On One Side
Baking browns on one side but stays pale on the other, or cakes rise unevenly despite being placed in the middle of the shelf. A seal that is not compressing evenly around the aperture allows hot air to escape at one point, upsetting the heat pattern inside the cavity. Check the door alignment and the seal around the whole aperture, not just at the front.
3
The Outer Door Or Handle Feels Excessively Hot
The door glass, handle or control panel becomes noticeably hotter to the touch than it used to during cooking. A perished seal allows hot air to escape past the door and heat the outer surfaces, which is both a comfort problem and a safety concern. Check the seal along the full perimeter and confirm the door is closing squarely.
4
Visible Splits, Cracks Or Crumbling Sections In The Seal
The rubber is visibly split, cracked or crumbling, usually at the corners or along the sides where it is compressed most. The surface may also feel hard and shiny rather than soft and springy, or show white stress marks where it flexes. A seal in this condition is no longer sealing properly and should be replaced.
5
The Seal Has Come Away From Its Channel
A section of the seal has dropped off the retaining channel, hangs loose at a corner or has detached completely. Even a small section that has come away allows heat to escape at that point and will progressively worsen as the door is opened and closed. Check the mounting bead along its full length for damage or distortion before refitting.
6
Steam, Odours Or Smoke Escaping Into The Kitchen
Steam, cooking odours or thin smoke escapes from around the door during baking, particularly noticeable when roasting or using high temperatures. A seal that is no longer compressing allows hot air and vapour out around the door edge. Check the full perimeter for gaps and confirm the door is closing flat against the aperture.
7
The Door Does Not Sit Flush Or Feels Loose When Closed
The door does not close fully, feels loose in the catch or springs back slightly when released. A seal that has hardened into a set shape or swollen with grease will push the door out of position, preventing it from sitting flat against the aperture. Check the hinges and the seal together, as a dropped door will also leak.
8
The Seal Is Stained, Greasy Or Blackened With Baked-On Residue
The rubber has become permanently stained, glossy with baked-on grease or blackened with carbon deposits that will not clean off. A greasy seal loses its grip and flexibility, and the build-up can hold the door slightly open or damage the rubber as it flexes. Replace the seal if cleaning does not restore a soft, matte finish.
9
The Oven Uses More Energy Or Trips The Supply More Often
The appliance runs for longer than it used to, and in some cases an element or thermostat that is already marginal will begin to trip the supply under the extra load. A leaking seal forces the heating components to work harder, which shortens their life. Address the seal before condemning the heating circuit.
Before Ordering, Check These First
Disclaimer: The fault codes and symptoms listed above are intended as a general guide to assist with diagnosis. They cannot be taken as a definitive diagnosis of any particular problem, and other components may produce similar symptoms. Always confirm the fault with proper testing before ordering parts. |
|---|---|
| Alternate Part Number | 5045382536285, G171252 |
| Manufacturer | Smeg Spare Parts |
| Genuine Part | Yes |
Oven
Door Seals
Oven door seals (often thought of as rubber) are actually engineered from heat-resistant materials. They prevent heat from escaping and ensure even cooking.
Over time, oven door seals can become worn, hardened, or damaged through natural wear and tear, mechanical damage, or improper use. When this happens, heat escapes from the oven cavity, leading to uneven cooking, longer preheat times, higher energy bills, and potentially scorch marks on adjacent kitchen cabinetry. Replacing a worn or faulty door seal is the most effective way to restore your cooker or oven to optimal performance.
Finding & Replacing Oven Door Seals
Oven door seals vary greatly by model, cavity type, and fixing points. Visual identification alone is rarely enough and often leads to errors — using your oven or cooker model number is critical to avoid ordering the wrong seal. If your model isn't listed above or you're unsure about compatibility, contact our spare parts team with your appliance make, model, and serial number, and we'll confirm the correct part for you.
Regular checks of the seal help maintain proper heat retention. If the seal is damaged or worn, replacing it promptly ensures even cooking, prevents burns to cabinetry, and maintains appliance efficiency.
Care & Maintenance
To extend the life of your oven door seal:
-
Clean the seal regularly using a non-abrasive sponge and lukewarm water
-
Avoid using abrasive cleaning products or metal scouring pads, which can damage the seal surface
-
The seal should remain soft and flexible (except on pyrolitic models using woven door seals)
-
Check the seal periodically for signs of wear or damage
Can't Find The Oven Door Seal You Need?
If you’re unsure which door seal fits your oven or cooker, provide us with your model details and we’ll help you find the correct replacement seal, including any compatible low-cost options.
Contact Support TeamExperts In
Smeg Spare Parts.
Smeg appliances are design icons, but their internal components are often shared with other brands. We use this overlap to save you money.
The Alternative Part Advantage
Smeg parts are frequently used across multiple brands. We identify when an "alternative" part is actually the exact same component from the same factory, just without the Smeg-branded packaging. This allows us to offer some of the lowest prices in the UK.
Fast Dispatch
Most common Smeg spares are stocked in the UK and ready for quick dispatch.
Specialist factory orders typically arrive within 7-10 working days, but some may take longer as advised.
Smeg Identification Requirements
Increasingly, Smeg requires the Service Index and Serial Number to determine the exact component revision. We cannot guarantee accuracy without these.
Understanding Smeg "Compatible" Spares
While some "pattern" parts are sometimes low-cost knock-offs, many of our compatible Smeg spares are Equivalent Replacements. That is to say, the same part only in different packaging.
Often, these are the original parts sourced directly from the component manufacturer (like Plaset, Askoll, or EGO) without the Smeg branding on the box.
Let Us Guide You
Trying to fathom which alternative is safe can be a challenge. We will always be honest with you: if a compatible part is high quality, we'll offer you both the original and the saving. If it's junk, we won't sell it.
Save on Smeg Spares
Contact us with your model details. We can usually supply Smeg parts cheaper than most UK suppliers by leveraging our cross-brand technical knowledge.
Get Help With Smeg PartsVerified Sourcing • Expert Sourcing Knowledge • Established 1988
UK'S Professional Appliance Spare Part Network • Established 1988
Delivery & Returns Information.
We aim to get your parts to you as fast as possible. We are transparent about lead times, stock availability, and our returns process to ensure a smooth repair.
Stock Availability
Please be aware that we show availability but do not display live stock levels online. Estimates are based on average manufacturer lead times.
Tradesman Warning
Do not arrange a tradesman until your goods have arrived and been checked. We do not cover tradesman costs due to transit delays or suitability issues.
Understanding Lead Times
Normally a UK stock item. Dispatched same or next working day. Some items may take longer depending on specific warehouse location.
Usually a UK/EU stocked item but with a longer lead time. Contact us before ordering for specific clarification if the repair is urgent.
Factory or Custom order items. These are ordered specifically for you and cannot ordinarily be returned. Please allow the full time indicated.
Order Transit
Orders placed before 3:00 PM (Mon-Fri) for in-stock items are typically dispatched same-day.
We use Royal Mail, DPD, and Evri. Tracking information is emailed upon dispatch. Delivery times to rural or offshore areas will vary.
Heavy/Oversized Items
Items such as dishracks, tubs, and glass cooktops may incur additional fees due to weight and specialised packaging requirements. We will contact you if additional shipping is required.
Returns Policy
Damages
Report transit damage within 24 hours. Include a photo of the damage and the packaging to speed up the claim process.
Cancellations
You have 14 days after delivery to cancel. This must be done via email or support ticket (not phone/chat).
Exclusions
We cannot accept returns for items that have been fitted for fault-finding, used, or custom-ordered.
How to Return an Item
Contact us with your order number and reason for return.
Wait for instructions and the correct returns address (this varies by item).
Package carefully. Do not deface original packaging. Use tracked post.
Have questions about your delivery or a potential return?
Contact Support Team98% of orders delivered on time • Expert Resolution • Established 1988