
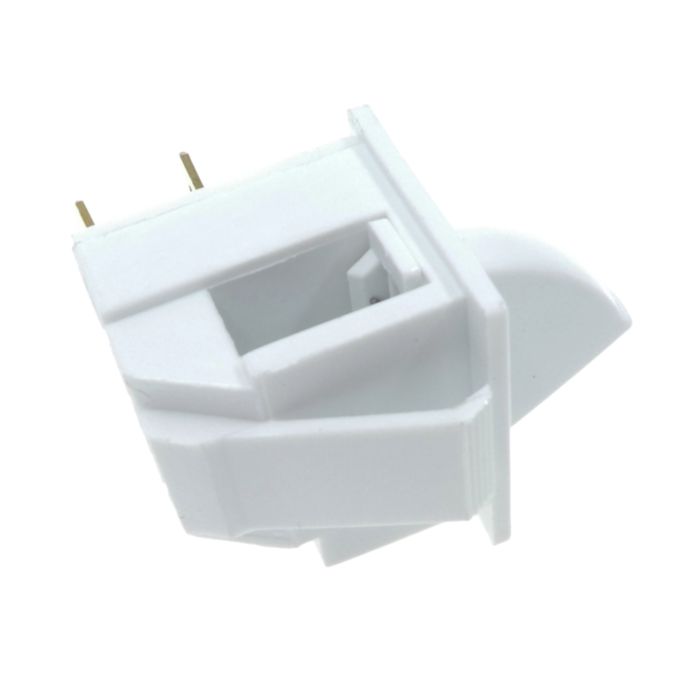
Fridge Door Light Switch
Genuine fridge door light switch – identical to the original factory-fitted switch for Belling, Bush, Caple, Ecron, Electra, Eureka, Lec, Montpellier, New Pol, Ok, Orima, Otsein, Qilive, Rangemaster, Schaub Lorenz, Servis, Sharp, Stoves, Sunfeel, Swan, Techwood, Tegran and Telefunken fridges & fridge freezers as shown unless advised otherwise
Description
This is a genuine fridge door light switch, supplied as the same component fitted at the factory, so it fits the original switch aperture, connects to the existing wiring, and operates the internal lamp exactly as the original did.
The door light switch is small but important: it presses against the door frame to turn the interior lamp on when the door opens and off as soon as it closes. Without a working switch, the fridge is either lit permanently—wasting energy, warming the cabinet, and shortening the lamp's life — or stays dark every time the door opens, making it awkward to find anything and hard to check on food. Fitting the correct genuine replacement restores reliable operation of the internal light and eliminates the small, constant waste of leaving the lamp on for hours at a time.
This switch is a widely used component and may be found on brands and models beyond those listed. If you are unsure of the correct fitment for your appliance, please contact us with the full model and serial number and we will be happy to confirm suitability before you order.
 Technical Notes
Specifications: Genuine fridge door light switch. Product code: 32007764. Type: door-operated lamp switch for the fridge or fridge freezer compartment. Function: switches the internal lamp on when the door opens and off when it closes. Supply: 220–240V AC. Mounting: fits the original switch aperture in the appliance cabinet. Connection: spade terminals to the existing wiring harness. Supplied as the switch only; the wiring harness, lamp, fixings, and aperture clips are not included unless listed separately.
Safety note: Isolate the appliance from the mains supply before starting work. The door light switch operates on the appliance mains circuit and connects directly to the internal wiring harness — never work on it while the appliance is plugged in. Allow any residual moisture or condensation around the switch aperture to dry before fitting, and avoid touching the switch terminals while the appliance is connected to power. Confirm the replacement matches the original in mounting, terminal layout and connector type before fitting, and never force a connector that does not seat easily, as this can damage both the switch and the appliance harness.
BELLING
BLL1850NFCW
BUSH
BALF60155W, BANF601UK, BI5050, BI7030FF, BIFF505, BRTL60170B, BRTL60170C, BRTL60170R, BSFF60B, BSFF60C, BSFF60R, BTL60150W
CAPLE
RI5
ECRON
COV185NFA, COV185NFAR, COV185NFARS, COV185NFEXA, FEU185NFXPLUS
ELECTRA
ECF, ECFF7
EUREKA
FEU185NF, FEU185NFA, FEU185NFPLUS, FEU200NFPLUS, FEU200NFXPLUS
LEC
Compatible but no specific models listed by retailers. Please check your model number with our team to confirm fitment.
MONTPELLIER
MFF145W
NEW POL
JEMET366X, JEMET370, JEMET386M, JEMET386MX, MET366, MY395, OMIKRON366, OMIKRON366X
OK
OFK341NFIB
ORIMA
ORA366W, ORA366X
OTSEIN
Compatible but no specific models listed by retailers. Please check your model number with our team to confirm fitment.
QILIVE
400061, 400254, 40061
RANGEMASTER
RFXF5, RFXF7
SCHAUB LORENZ
SLUE235W4 (5101738788 10712374)
SERVIS
CF60185NF, CF6020NFW
SHARP
SJ-B1227M01, SJ-B1237M01, SJB1227, SJB123
STOVES
STINT70F
SUNFEEL
FGF1851, FGF1851X, FGS185
SWAN
SR9050, SR9050W1, SR9051B, SR9051R, SR9051S, SR9051W, SR9052B, SR9052R, SR9052W
TECHWOOD
TW3701A
TEGRAN
TG18558, TG367A, TGV18514, TGV18515NFX, TGVF14185, TGX18500
TELEFUNKEN
14TLK1850M, 14TLK2000MW, 14TLK2000MX, 14TLK465M, 14TLK465MX, 15TLK3702, TLK1850M, TLK1850MX, TLK2000MW, TLK2000MX, TLK366A, TLK36712A, TLK367A, TLK378WA

Get Expert Fridge Freezer Spare Part Help
Can't find your model number listed or need help identifying the correct part? Contact our parts advisors with your full model and serial number, and we'll verify the correct part for your appliance.
| Further Description |
Common Faults & SymptomsThe following symptoms are commonly reported when a fridge door light switch begins to fail. Use this as a diagnostic guide before ordering a replacement — if more than one of these is present, the switch is the likely culprit. 1
INTERNAL LAMP DOES NOT COME ON WHEN THE DOOR IS OPENED
The most common symptom. The door opens, but the internal lamp does not light. This usually means the switch contacts have failed closed in the open position, so no current reaches the lamp regardless of how the door is positioned.
2
LAMP STAYS ON PERMANENTLY, EVEN WITH THE DOOR CLOSED
The opposite failure. The switch no longer opens the circuit, so the lamp stays lit the whole time the appliance is plugged in. This wastes energy, warms the cabinet and shortens the life of the lamp — the switch must be replaced.
3
LAMP FLICKERS OR WORKS INTERMITTENTLY
A lamp that flickers as the door moves, or that lights only when the door is opened to a particular angle, points to worn contacts inside the switch. This is an early stage of failure and the switch will eventually stop working altogether.
4
SWITCH PLUNGER IS STUCK, BROKEN OR MISSING
The visible part of the switch is the plunger or button that presses against the door frame. If it has snapped off, become stuck in one position or is missing altogether, the switch can no longer respond to the door being opened and closed and must be replaced.
5
SWITCH FEELS LOOSE IN ITS HOUSING
If the switch moves within its aperture or feels unstable when the door closes against it, the retaining clips or the housing have worn. A loose switch will not make reliable contact and can fall out of position entirely.
6
BURNT SMELL OR DISCOLOURATION AROUND THE SWITCH
A switch that has overheated may show visible scorch marks or give off a burnt smell. This indicates that the internal contacts have failed and the switch should be replaced without delay, as it may also have damaged the wiring or the appliance control.
7
LAMP LIGHTS EVEN WITH THE DOOR WIDE OPEN — OR NOT AT ALL
A lamp that is permanently on, or permanently off, no matter how the door is positioned confirms that the switch is no longer responding to door movement. The internal mechanism has failed and the switch must be replaced.
8
CIRCUIT BREAKER OR RCD TRIPS WHEN DOOR IS OPENED
A switch with damaged internal insulation or moisture ingress can allow current to leak to earth, tripping the household circuit breaker or RCD when the lamp is triggered. The switch should not be used again until it has been replaced and the circuit tested.
Fitment GuidanceThis part is compatible only with the models listed in the compatibility matrix above. Even if a part looks visually identical, internal specifications can differ.
Diagnostic TipsBefore concluding that the part has failed, carry out these checks to rule out other causes.
Installation GuideThese steps describe the general procedure. The exact sequence varies between models, so always consult the appliance service manual where available.
Before Ordering, Check These First
Disclaimer: The fault codes and symptoms listed above are intended as a general guide to assist with diagnosis. They cannot be taken as a definitive diagnosis of any particular problem, and other components may produce similar symptoms. Always confirm the fault with proper testing before ordering parts. |
|---|---|
| Alternate Part Number | 5045178830948, VST32007764, 5045176632063, 32007761, 32031240, 49018299, 1041129, 814490868, 481203688001 |
| EAN Number | 32007764 |
| Manufacturer | Vestel |
| Genuine Part | Yes |
Fridge & Freezer Spare Parts.
Refrigeration components are highly model-specific. Don't rely on generic user manuals which cover entire ranges; locating your precise rating plate is the only way to guarantee fitment.
Locating the Rating Plate
In fridges, check the inner side walls near the salad crisper. In freezers, the sticker is often located behind the lower storage baskets. This data plate is vital for both genuine and compatible sourcing.
Technician-Curated
We only list parts that our engineers actually use or customers frequently request. This prevents you from sifting through thousands of irrelevant components that never fail, making the search fast and relevant.
! Images & Sizes for Information Only
Component parts may vary in shape, size, or terminal layout from the images shown. Manufacturers frequently update designs or alter production specifications without notice.
CRITICAL: Many refrigeration parts look identical but are position-specific or used in thousands of variations. Do not rely on visual comparison—verify via model data or ask us first.
Get it Right, First Time.
Ordering the wrong refrigeration part is a major hassle. We want to help you avoid the cost and inconvenience of incorrect fitment.
Emailing us allows our experts to send technical drawings and diagrams directly to you. It is the most reliable way to identify parts and find money-saving alternatives.
Unsure of compatibility?
Don't be hasty. One wrong digit leads to the wrong part!
Verify With An ExpertProfessional Diagnosis • SPARE PARTS Sourcing • Established 1988
 Turkish OEM Manufacturing Giant
Vestel
Spare Parts.
Vestel is one of the world's largest appliance manufacturers, rivaling Beko (Arcelik). While you rarely see the "Vestel" badge in a showroom, they build the machines for Sharp, Servis, Bush, Kenwood, and Baumatic, along with scores of high-street retailer labels.
The Rebadging Complexity
Because Vestel manufactures for so many different brands, a single part often fits hundreds of different models under different names. However, minor production changes are frequent, making technical verification essential.
The "Information Gap"
It is common for us to have a Vestel part in stock that fits your machine, even if your machine isn't badged as Vestel. We use our internal technical knowledge to link these rebadged models back to the original Vestel component.
Professional Advisory
Unless you are certain of the part number, always check suitability with our team. A slight variation in a Vestel production run can mean a difference in connector types or control module firmware.
Unsure of your Vestel part?
Don't guess with rebadged Turkish components. Send us your appliance brand and model number, and our technical specialists will perform a manual verification.
Contact Specialist TeamOEM Sourcing Expert • Technical Helpdesk • Established 1988
UK'S Professional Appliance Spare Part Network • Established 1988
Delivery & Returns Information.
We aim to get your parts to you as fast as possible. We are transparent about lead times, stock availability, and our returns process to ensure a smooth repair.
Stock Availability
Please be aware that we show availability but do not display live stock levels online. Estimates are based on average manufacturer lead times.
Tradesman Warning
Do not arrange a tradesman until your goods have arrived and been checked. We do not cover tradesman costs due to transit delays or suitability issues.
Understanding Lead Times
Normally a UK stock item. Dispatched same or next working day. Some items may take longer depending on specific warehouse location.
Usually a UK/EU stocked item but with a longer lead time. Contact us before ordering for specific clarification if the repair is urgent.
Factory or Custom order items. These are ordered specifically for you and cannot ordinarily be returned. Please allow the full time indicated.
Order Transit
Orders placed before 3:00 PM (Mon-Fri) for in-stock items are typically dispatched same-day.
We use Royal Mail, DPD, and Evri. Tracking information is emailed upon dispatch. Delivery times to rural or offshore areas will vary.
Heavy/Oversized Items
Items such as dishracks, tubs, and glass cooktops may incur additional fees due to weight and specialised packaging requirements. We will contact you if additional shipping is required.
Returns Policy
Damages
Report transit damage within 24 hours. Include a photo of the damage and the packaging to speed up the claim process.
Cancellations
You have 14 days after delivery to cancel. This must be done via email or support ticket (not phone/chat).
Exclusions
We cannot accept returns for items that have been fitted for fault-finding, used, or custom-ordered.
How to Return an Item
Contact us with your order number and reason for return.
Wait for instructions and the correct returns address (this varies by item).
Package carefully. Do not deface original packaging. Use tracked post.
Have questions about your delivery or a potential return?
Contact Support Team98% of orders delivered on time • Expert Resolution • Established 1988