
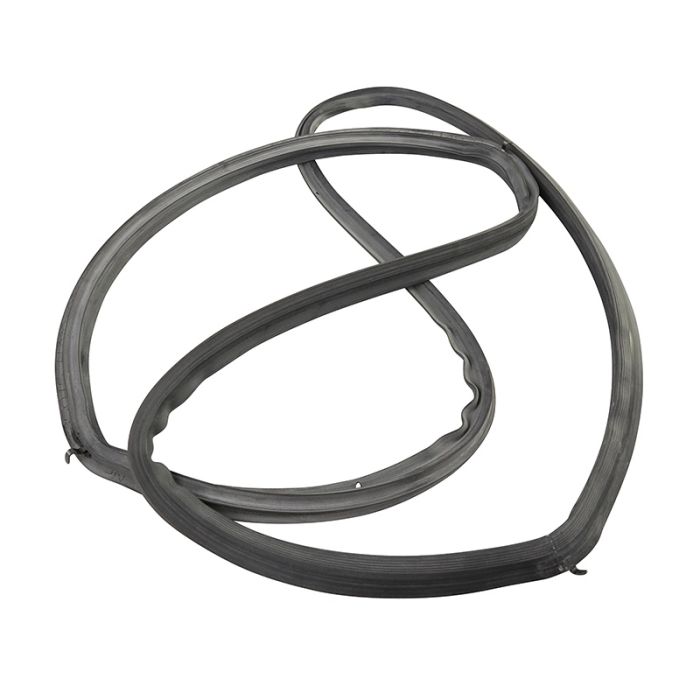
Genuine Oven Door Seal
Replacement oven door seal – compatible with Bosch, Neff, Siemens, Balay, Constructa, Junker, Pitsos, Profilo and Viva ovens & cookers as shown unless advised otherwise
Description
A genuine replacement oven door seal for the Bosch, Neff, Siemens, Balay, Constructa, Junker, Pitsos, Profilo and Viva ovens and cookers listed below.
The seal runs around the inner rim of the oven door and forms the flexible, heat-resistant barrier that closes the gap between the door and the oven cavity. Its purpose is twofold: to keep heat inside the oven so it reaches and maintains temperature efficiently, and to stop hot air and steam from escaping into the kitchen during cooking. Because it is the part of the door in direct contact with the hot cavity, the seal is manufactured from heat-resistant material that must remain soft and springy even after repeated exposure to high temperatures.
Oven door seals deteriorate gradually, and people often overlook their failure until cooking results suffer. The most common problem is that the rubber hardens and flattens with age, losing the flexibility needed to press against the cavity rim. As it hardens, it can also crack, split or detach from its retaining clips, and food debris baked onto the surface prevents it from seating properly. Once the seal no longer closes the gap, heat escapes continuously around the door—the oven takes longer to reach temperature, runs hotter at the front than the back, and struggles to hold a steady heat, leading to uneven baking and higher energy use. The outer door and handle may also become uncomfortably hot to touch, and in some cases the control knobs and fascia are exposed to excessive heat. Replacing the seal restores efficient, even cooking and reduces running costs.
This seal fits over 7400 different models, so not all are listed here. Please ask if you are unsure.
 Technical Notes
Specifications: Type: oven door seal / gasket. Material: heat-resistant rubber. Colour: typically black or grey. Fitting: clip or channel retained around the inner door rim. Supplied as: seal only. Product code: 10034227. Genuine BSH part.
Fitment guidance: This oven door seal is known to fit only the models listed below, and will not fit any others. The model number is normally found on the rating plate on the rear of the appliance, behind the plinth or on the inner face of the oven door. Because several seals look almost identical while differing in profile, length and corner radius, always confirm the full model and serial number against the compatibility list rather than relying on appearance alone. This seal fits over 7400 different models, so not all are listed here. Please ask if you are unsure. Where a brand shows TBC, please check your model number with our team to confirm fitment before ordering.
Diagnostic tip: Before ordering, open the oven door and inspect the existing seal carefully with a torch. Run a finger along its full length and flex it gently — a healthy seal should feel soft and springy. If it has hardened, become shiny and flat, or developed splits and cracks along the fold, it can no longer form a tight seal. Look for sections where the seal has come away from its retaining clips or where food debris has baked onto the surface and is preventing it sitting flat. Carry out the paper test by placing a strip of paper between the door and the cavity at several points around the rim and closing the door — if the paper pulls out easily at any point, the seal is not gripping there. Check the door hinges for wear or sagging at the same time, because a door that has dropped will not seal properly even with a new gasket.
Installation guide: 1. Isolate the appliance from the electrical supply and allow it to cool completely. 2. Open the oven door fully and note how the existing seal is retained — most are held in place by a series of small clips pushed into holes around the door rim, while some are a push-fit into a channel. 3. Starting at one corner, ease the old seal away from the door, working steadily around the circumference and releasing each clip in turn. 4. Clean the door rim thoroughly, removing all traces of the old seal, food residue and grease, and inspect the retaining holes or channel for damage. 5. If the seal has been stored cool or folded, allow the new gasket to reach room temperature and straighten it out before fitting. 6. Starting at the top centre, press the clips of the new seal into the retaining holes around the door rim, working around the circumference a section at a time. 7. Work the seal into the corners carefully, checking that the profile is not twisted and that the rubber sits evenly against the door. 8. Run a finger around the entire seal to confirm it is fully seated and that no clips have been missed. 9. Close the door and check that it pulls shut evenly and that the seal contacts the cavity rim all the way around. 10. Restore the power and run the oven for a short period to confirm correct operation and check for heat escape around the door edge.
Safety note: Always isolate the appliance from the mains before starting work and allow the oven to cool fully — residual heat in the cavity and door can cause severe burns. Take care with the sharp edges of the door frame and the cavity rim while the seal is removed. Never force the new seal into position with a sharp tool, as this can tear the rubber and cause it to fail again. If the oven door hinges show signs of wear or the door does not hang evenly, address these before fitting the new seal, as a misaligned door will quickly damage a replacement gasket.
BALAY OVEN & COOKER
3HB404XM/07
BOSCH OVEN & COOKER
HBF011BR0/02, HBF011BR0/03, HBF011BR0/04, HBF011BR0/05, HBF031BR0/01, HBF031BR0/02, HBF031BR0/03, HBF031BR0/04, HBA33B250/70, HBF011BR0K/01, HBF011BR0K/03, HBF011BR0K/04, HBF011BR2M/03, HBF133BR0/02, HBF133BR0/03, HBF133BR0/04, HBF133BR0/05, HBF133BR0/06, HBF133BR0/07, HBF133BR0N/01, HBF133BR0N/03, HBF154BS0/02, HBF154BS0/03, HBF154BS0/04, HBF154BS0/05, HBFN10BA0/02, HBFN10BA0/03, HE113FBS2/02, HE113FBS2/03, HE113FBS2/04, HE113FBS2/07, HB010FBR0T/02, HB010FBR1S/02, HB010FBR1S/03, HB010FBR1S/04, HB010FBR1S/05, HB114FBW0T/02, HB114FBW0T/03, HB114FBW0T/04, HB20AB520/61, HB214FBS0T/01, HB214FBS0T/02, HB214FBW0T/01, HB214FBW0T/02, HB36GB550J/61, HB514FBH0T/02, HB514FBH0T/03, HB514FBR0T/03, HB514FBR0T/04, HB514FBR0T/05, HB514FBR0T/06, HBA23B150/70, HBA23B150R/61, HBA23B150R/70, HBA23B250/61, HBA23B250/70, HBA33B150/70, HBA33B250/61, HBF010BR1S/01, HBF010BR1S/02, HBF010BR1S/03, HBF010BR1S/04, HBF011BR0/06, HBF011BR0/07, HBF011BR0/08, HBF011BR0/09, HBF011BR0/10, HBF031BR0/05, HBF031BR0/06, HBF031BR0/07, HBF031BR0/08, HBF113BR0Y/02, HBF113BR0Y/03, HBF113BR0Y/04, HBF113BR0Y/05, HBF113BR0Z/02, HBF113BR0Z/05, HBF113BR0Z/06, HBF113BS0Z/01, HBF113BS0Z/03, HBF113BS0Z/04, HBF113BS0Z/05, HBF113BS1/03, HBF113BS1/04, HBF113BS1/05, HBF113BS1/06, HBF114BB0R/02, HBF114BB0R/03, HBF114BB0R/04, HBF114BB0R/05, HBF114BB0R/06, HB56GU550A/45, HB56GU550A/52, HB56GU550A/61, HBA13B252A/45, HBA13B252A/56, HBA13B254A/01, HBA13B254A/02, HBA13B254A/03, HBA13B254A/70, HBA13B254A/71, HBA23B150A/45, HBA23B150A/56, HBA23B151A/02, HBA23B151A/03, HBF113BR0A/01, HBF113BR0A/02, HBF113BR0A/03, HBF113BR0A/04, HBF113BR0A/05, HBF113BR0A/06, HBF113BR0A/07, HBF113BR0A/09, HBF113BR0A/10, HBF113BR0A/11, HBF113BR0A/12, HBF133BS0A/06, HHF113BA0B18
CONSTRUCTA OVEN & COOKER
CH10322/08, CH1M00050/14, CF2M50050/19, CH5M00050/11, CH2M50050/16, CF2M50050/22
JUNKER OVEN & COOKER
JH130, JF2346050/06
NEFF OVEN & COOKER
TBC – Please check your model number with our team to confirm fitment.
PITSOS OVEN & COOKER
PE10M40X1/02
PROFILO OVEN & COOKER
FRMA680/03, FRMA952/50
SIEMENS OVEN & COOKER
HB43AB521J/70, HB331E4/02, HB23AT510, HBA241320, others TBC
VIVA OVEN & COOKER
VVH32C4150/03, VVH32A3150/56

Get Expert Oven & Cooker Spare Part Help
Can't find your model number listed or need help identifying the correct part? Contact our parts advisors with your full model and serial number, and we'll verify the correct part for your appliance.
| Further Description |
Common Faults & SymptomsThe following fault codes and symptoms are commonly reported when this part begins to fail. Use this as a diagnostic guide before ordering a replacement — if more than one of these is present, the part is the likely culprit. 1
Oven Takes Longer to Reach Temperature
One of the earliest signs that the door seal is no longer doing its job. With heat escaping around the door, the oven has to run longer and harder to reach the set temperature, and may struggle to hold a steady heat once there. If cooking times have crept up and the oven seems to be running almost continuously, check the seal before assuming the thermostat or element has failed.
2
Uneven Cooking and Hot Spots
When the seal fails, heat escapes unevenly around the door, so the front of the oven runs cooler than the back and one side of a tray can brown faster than the other. Cakes may rise unevenly, biscuits may cook faster at the back, and roasts may brown on one side only. This is often attributed to a faulty fan or element, but a worn door seal is a common and easily overlooked cause.
3
Outer Door or Handle Becoming Very Hot
A healthy door seal keeps heat inside the cavity, so the outer door and handle stay cool enough to touch safely. If the door glass, handle or fascia becomes uncomfortably hot during cooking, heat is escaping through the door and the seal is no longer forming an effective barrier. This is a safety concern as well as a performance issue and should be investigated promptly.
4
Visible Cracks, Hardening or Detachment of the Seal
Open the door and inspect the seal with a torch. A healthy gasket is soft, springy and stays securely in place around the full circumference. If it has become hard and shiny, developed splits or cracks along the fold, or has come away from its retaining clips in one or more places, it can no longer press against the cavity rim effectively. This is the most direct physical evidence that the seal needs replacing.
5
Steam or Heat Visible Around the Door When Cooking
During cooking, particularly with a roast or casserole, you may see steam or a haze of hot air escaping around the edges of the door. On a well-sealed oven this should not happen — the only steam should be from the rear vent. Steam escaping at the door face means the gasket is not forming an airtight barrier, and it will accelerate the deterioration of the outer door trim and control panel over time.
6
Door Difficult to Open or Sticks Shut
As a door seal ages, it can become tacky or sticky and may stick to the oven frame, making the door difficult to open. This is particularly common if food debris has baked onto the seal. In some cases the seal may also swell or distort, jamming against the cavity rim. Clean the seal and the door frame with warm soapy water first to remove residue; if the sticking persists, the seal material has degraded and replacement is required.
7
Excessive Energy Use During Cooking
A door seal that allows heat to escape makes the oven work harder to hold temperature, which shows up as an increase in energy consumption. If your electricity use has crept up without explanation, and the oven seems to run longer than it used to, the door seal is a strong candidate. Replacing a worn seal is an inexpensive repair that typically pays for itself in reduced running costs over time.
8
Discolouration or Heat Damage on the Inner Door Panel
Where the seal has been failing for some time, hot air and steam will have been escaping around the door and baking onto the inner panel. Look for yellowed or discoloured patches on the inner door trim, heat distortion around the seal channel, and heat staining on the door fascia or control knobs. These are signs that the seal has been failing for a while and should be replaced before the damage spreads further.
Before Ordering, Check These First
Disclaimer: The fault codes and symptoms listed above are intended as a general guide to assist with diagnosis. They cannot be taken as a definitive diagnosis of any particular problem, and other components may produce similar symptoms. Always confirm the fault with proper testing before ordering parts. |
|---|---|
| Alternate Part Number | 5055006994247, 00626168, 00754066, 626168, GSK9693 |
| Manufacturer | BSH |
| Genuine Part | Yes |
Oven
Door Seals
Oven door seals (often thought of as rubber) are actually engineered from heat-resistant materials. They prevent heat from escaping and ensure even cooking.
Over time, oven door seals can become worn, hardened, or damaged through natural wear and tear, mechanical damage, or improper use. When this happens, heat escapes from the oven cavity, leading to uneven cooking, longer preheat times, higher energy bills, and potentially scorch marks on adjacent kitchen cabinetry. Replacing a worn or faulty door seal is the most effective way to restore your cooker or oven to optimal performance.
Finding & Replacing Oven Door Seals
Oven door seals vary greatly by model, cavity type, and fixing points. Visual identification alone is rarely enough and often leads to errors — using your oven or cooker model number is critical to avoid ordering the wrong seal. If your model isn't listed above or you're unsure about compatibility, contact our spare parts team with your appliance make, model, and serial number, and we'll confirm the correct part for you.
Regular checks of the seal help maintain proper heat retention. If the seal is damaged or worn, replacing it promptly ensures even cooking, prevents burns to cabinetry, and maintains appliance efficiency.
Care & Maintenance
To extend the life of your oven door seal:
-
Clean the seal regularly using a non-abrasive sponge and lukewarm water
-
Avoid using abrasive cleaning products or metal scouring pads, which can damage the seal surface
-
The seal should remain soft and flexible (except on pyrolitic models using woven door seals)
-
Check the seal periodically for signs of wear or damage
Can't Find The Oven Door Seal You Need?
If you’re unsure which door seal fits your oven or cooker, provide us with your model details and we’ll help you find the correct replacement seal, including any compatible low-cost options.
Contact Support Team BSH Group Platform Specialist
Bosch / Neff / Siemens
Spare Parts.
Bosch appliances are produced by the BSH Group, which also owns Neff and Siemens. Many components are shared across these brands and their regional variants, making accurate model identification essential for correct part selection.
ENR-Based Identification Is Mandatory
Almost all Bosch, Neff, and Siemens appliances are produced in multiple variants. To ensure correct fitment, the full model number or ENR number from the rating plate is required. Visual comparison alone is unreliable.
Cross-Brand Compatibility
Many functional components, such as heating elements, motors, switches, and pumps, are shared across Bosch, Neff, Siemens, and other BSH-owned brands. Correct cross-referencing can significantly reduce repair costs without compromising quality.
Variant Sensitivity
Bosch parts can vary significantly by revision, and some genuine components are expensive. Ordering without confirming the ENR can result in incorrect or incompatible parts. When in doubt, verification is strongly advised.
Confirm Your Bosch, Neff or Siemens Spares
Provide the full model or ENR number, and our technical team will check your appliance against the correct BSH platform to ensure exact fitment.
Contact Support TeamBSH Specialist • Cross-Brand Parts Expertise • Established 1988
UK'S Professional Appliance Spare Part Network • Established 1988
Delivery & Returns Information.
We aim to get your parts to you as fast as possible. We are transparent about lead times, stock availability, and our returns process to ensure a smooth repair.
Stock Availability
Please be aware that we show availability but do not display live stock levels online. Estimates are based on average manufacturer lead times.
Tradesman Warning
Do not arrange a tradesman until your goods have arrived and been checked. We do not cover tradesman costs due to transit delays or suitability issues.
Understanding Lead Times
Normally a UK stock item. Dispatched same or next working day. Some items may take longer depending on specific warehouse location.
Usually a UK/EU stocked item but with a longer lead time. Contact us before ordering for specific clarification if the repair is urgent.
Factory or Custom order items. These are ordered specifically for you and cannot ordinarily be returned. Please allow the full time indicated.
Order Transit
Orders placed before 3:00 PM (Mon-Fri) for in-stock items are typically dispatched same-day.
We use Royal Mail, DPD, and Evri. Tracking information is emailed upon dispatch. Delivery times to rural or offshore areas will vary.
Heavy/Oversized Items
Items such as dishracks, tubs, and glass cooktops may incur additional fees due to weight and specialised packaging requirements. We will contact you if additional shipping is required.
Returns Policy
Damages
Report transit damage within 24 hours. Include a photo of the damage and the packaging to speed up the claim process.
Cancellations
You have 14 days after delivery to cancel. This must be done via email or support ticket (not phone/chat).
Exclusions
We cannot accept returns for items that have been fitted for fault-finding, used, or custom-ordered.
How to Return an Item
Contact us with your order number and reason for return.
Wait for instructions and the correct returns address (this varies by item).
Package carefully. Do not deface original packaging. Use tracked post.
Have questions about your delivery or a potential return?
Contact Support Team98% of orders delivered on time • Expert Resolution • Established 1988